Life in Minnesota. Wife to One. SAHM to Two. Lover of DIY, cooking, photography. Staying grounded with my Etsy shop and parenthood! Keepin' it real through this blog!
Showing posts with label diy. Show all posts
Wednesday, December 11, 2013
Cheesy Chicken Enchiladas
These cold Minnesota days, cause me to crave the food heavy-laden with cheese and gooey-ness! Introducing....Cheesy Chicken Enchiladas...the epitome of all things cheesy and gooey!
I want to put a disclaimer on my recipes. I cook for comfort. I cook for cravings. My recipes contain meat. They contain fat. They contain butter and cheese. They may even contain some whiskey. I love to cook and even more, I love to eat what I cook! This is not a place to find healthy or light recipes...possibly down the road when I am 10 pounds heavier and 10 years older :)
The origination for these enchiladas is actually Colorado. Ross' uncle Paul made these for us when we visited him, back during our college days. We loved them so much, they have been on our permanent menu rotation ever since!
Cheesy Chicken Enchiladas
Ingredients:
4 Chicken Breasts, Thawed and Boiled in Water
8 oz. Cream Cheese, Softened
1 Cup Sour Cream
1 Small Can Diced Green Chiles
1 Small Onion, Chopped and Sauteed in Butter
Cayenne Pepper, Salt, and Tobasco to Taste
5-7 Buritto Size Flour Tortillas
1 Pound Grated Mozzarella Cheese
1/2 Cup Liquid Whipping Cream
Once chicken has been fully cooked in boiling water, shred meat.
I found a super easy way of doing this with your KitchenAid! Pop it in the bowl and mix it up!
In separate bowl, combine cream cheese, sour cream, green chiles, onion, and spices. Add chicken. Mix.
Take filling and spread down middle of tortilla. Fold tortilla over, lay seam side down in 9x13 pan. Repeat. Sprinkle enchiladas with mozzarella and pour whipping cream over top.
Bake in 350 degree oven for 30 minutes or until enchiladas are bubbly and browning on top.
Serve with salsa.
Sunday, November 17, 2013
DIY Window Cleaner
I HATE dirty windows! You would never know this though, by the look of my windows...AT ALL TIMES! I have a three year old and a dog who LOVE to climb on the back of the couch and put their grubby noses and fingers (son, not the dog) all over my front window! Since I have children and a puppy, I have chosen to not care so much. Pick and choose your battles. Clean laundry is much more important than clean windows!
I still hate dirty windows, so if they could be clean for at least a couple of hours...I am satisfied! To continue on with our DIY posts, I have a DIY window cleaner! Great transition?!?! If you are like me and you want your kids to help with chores, Windex can be VERY expensive for the amount of cleaner they use :). So, why not make your own!?!? I also recommend letting them use a cotton towel versus paper towels!
Perfectly Perfect Window Cleaner
What You Need
1-Empty Spray Bottle
1/4 Cup White Vinegar
1 Cup Water
3-4 Drops of Dawn Dish Soap (once again, I used Target brand)
Combine all ingredients. Give a little shake and you, my friend, have created your own window cleaner! Congrats!
Have any other tips for DIY? Leave a comment!
Marianne
Monday, September 23, 2013
DIY Monday: Homemade Spaghetti Sauce
Since I am getting a little "salsa-ed" out...80 jars will do that to you, I needed a recipe for all of my tomatoes. Thankfully, my mom had a recipe for, Big Batch Tomato Sauce. I thought, why not, and took the morning with my momma and made some spaghetti sauce!
Big Batch Tomato Sauce
3 Medium Onions-Sliced
3 Large Carrots-Grated
2 Medium Green Peppers-Chopped
2 Cloves Garlic-Minced
1/4 Cup Oil (olive or vegetable)
Cook until tender in a stock pot.
1 1/2 tsp Fresh Basil-Chopped
2 T Salt
1/2 tsp Pepper
12 Pounds Tomatoes-Peeled and Chopped
1-12 Ounce Can Tomato Paste
1/4 Cup Packed Brown Sugar
Add to vegetable mix. Mix well. Bring to boil. Reduce heat to low. Loosely cover pot and simmer for 2 hours, stirring occasionally. Pour into sterile jars and can in a water bath for 15 minutes or you can freeze.
Makes roughly 9 pints.
All labels on the jars can be found at CindyBlue Designs!
Another note...I am making the switch to Word Press! My goal is to be up and running some time this week. My new blog address will be: www.stayinggroundedinfaith.com. Bookmark it! Follow it! I cannot wait to continue this journey with you!!
Marianne
Big Batch Tomato Sauce
3 Medium Onions-Sliced
3 Large Carrots-Grated
2 Medium Green Peppers-Chopped
2 Cloves Garlic-Minced
1/4 Cup Oil (olive or vegetable)
Cook until tender in a stock pot.
1 1/2 tsp Fresh Basil-Chopped
2 T Salt
1/2 tsp Pepper
12 Pounds Tomatoes-Peeled and Chopped
1-12 Ounce Can Tomato Paste
1/4 Cup Packed Brown Sugar
Add to vegetable mix. Mix well. Bring to boil. Reduce heat to low. Loosely cover pot and simmer for 2 hours, stirring occasionally. Pour into sterile jars and can in a water bath for 15 minutes or you can freeze.
Makes roughly 9 pints.
All labels on the jars can be found at CindyBlue Designs!
Another note...I am making the switch to Word Press! My goal is to be up and running some time this week. My new blog address will be: www.stayinggroundedinfaith.com. Bookmark it! Follow it! I cannot wait to continue this journey with you!!
Marianne
Monday, September 16, 2013
DIY Monday: Cleaning the Microwave
Looking for a simple, low-cost, DIY, cleaning solution for your microwave? Well, look no further my friends!
Microwave Cleaner

Ingredients:
2 Cups Water
1 Cup White Vinegar
1 Tablespoon Lemon Juice
Mix ingredients in a glass measuring cup. Why the lemon juice? I like the smell!
Microwave for 10 minutes and wipe clean!
The steam helps to loosen the food, therefore making it super easy to clean!
Take a look at my before and after pics and you KNOW this method works!
Have a good one!
Marianne
Microwave Cleaner
Ingredients:
2 Cups Water
1 Cup White Vinegar
1 Tablespoon Lemon Juice
| Before the Cleaning |
| After the Cleaning |
Mix ingredients in a glass measuring cup. Why the lemon juice? I like the smell!
Microwave for 10 minutes and wipe clean!
The steam helps to loosen the food, therefore making it super easy to clean!
Take a look at my before and after pics and you KNOW this method works!
Have a good one!
Marianne
Monday, August 26, 2013
DIY Monday: Roasted Corn
What? You boil your corn? How boring!
People keep telling us to bake the corn in the oven. "It is so good!" "The best corn you will ever have," they say! Well....we got some corn from my mom and dad and decided to try roasting it. All I knew was 350 degrees, so we did what we do best...we winged it!
Here are the directions:
Preheat oven to 350 degrees
Place corn directly on oven rack (don't remove from husks)
Cook for 30-35 minutes
The kitchen will start to smell of corn!
Remove from husks...they peel right off like a banana and ta-da!!!
Best.Corn.Ever!!!! So simple!
Enjoy!
How do you like to eat your corn on the cob?
Marianne
People keep telling us to bake the corn in the oven. "It is so good!" "The best corn you will ever have," they say! Well....we got some corn from my mom and dad and decided to try roasting it. All I knew was 350 degrees, so we did what we do best...we winged it!
Here are the directions:
Preheat oven to 350 degrees
| Corn...Before |
Clean off any extra hairs, strings, dangly things...whatever you want to call them! I just used a scissor. You don't want to start a fire! In case you do, call 911 :) or just keep the oven door closed!
| Corn...Cleaned |
| Scraps |
Place corn directly on oven rack (don't remove from husks)
| Starting to Roast |
Cook for 30-35 minutes
The kitchen will start to smell of corn!
| Almost Done! |
| Finished Product! |
| Yum! |
Remove from husks...they peel right off like a banana and ta-da!!!
Best.Corn.Ever!!!! So simple!
Enjoy!
How do you like to eat your corn on the cob?
Marianne
Monday, August 19, 2013
DIY Monday: Bathtub Cleaner
I am the type of housewife who has a tidy house, but if you look a little bit closer, there are areas that do not get as much attention. Number one...the bathroom. I HATE to clean the bathroom. I clean the toilet the most, for obvious reasons, but the bathtub is....forget it...I just don't clean it. Once a month? Maybe?
There are times when my in-laws are coming over to watch the kids and I think "Good Lord! I hope they don't give the kids a bath!" Disgusting? Yes! Am I ashamed? Heck no. I have better things to do than clean my tub. Until....my cousin Sara was over this weekend and told me that before her kids take a bath EVERY time, she sprays the tub with Tilex and wipes it out. Cue the eye rolling. Are you serious? Every time? I need to step up my game! Between my thick hair, leg hair, Natalie's hair and whatever my husband has, plus the daily dirt of a three year old, I need to do better!
That is where this post is originating from. I spent my weekend in search of the BEST DIY bathtub cleaner! I found it! I love it! I will never go back! It is so stinkin' simple and so stinkin' effective. Are you ready for the ingredients?
Amazing Bathtub Cleaner
1.White Vinegar
2.Blue Dawn Dish Soap (I used the Target brand)
That's it!!!! Totally Wicked!! (We love The Incredibles in our house :)
Take 1/2 cup white vinegar and heat for 30 seconds in microwave.
Pour in spray bottle.
Add 1/2 cup Blue Dawn Dishsoap.
Gently mix together.
Spray, scrub, rinse clean!
My tub has not looked so clean in.....FOREVER! Since we installed the tub and it was brand new!!
I don't have a "before" picture but just imagine soap scum and grime!
What do you love about DIY cleaners? I think they are fantastic! Enjoy your Monday!
Marianne
There are times when my in-laws are coming over to watch the kids and I think "Good Lord! I hope they don't give the kids a bath!" Disgusting? Yes! Am I ashamed? Heck no. I have better things to do than clean my tub. Until....my cousin Sara was over this weekend and told me that before her kids take a bath EVERY time, she sprays the tub with Tilex and wipes it out. Cue the eye rolling. Are you serious? Every time? I need to step up my game! Between my thick hair, leg hair, Natalie's hair and whatever my husband has, plus the daily dirt of a three year old, I need to do better!
That is where this post is originating from. I spent my weekend in search of the BEST DIY bathtub cleaner! I found it! I love it! I will never go back! It is so stinkin' simple and so stinkin' effective. Are you ready for the ingredients?
Amazing Bathtub Cleaner
1.White Vinegar
2.Blue Dawn Dish Soap (I used the Target brand)
That's it!!!! Totally Wicked!! (We love The Incredibles in our house :)
Take 1/2 cup white vinegar and heat for 30 seconds in microwave.
Pour in spray bottle.
Add 1/2 cup Blue Dawn Dishsoap.
Gently mix together.
Spray, scrub, rinse clean!
My tub has not looked so clean in.....FOREVER! Since we installed the tub and it was brand new!!
I don't have a "before" picture but just imagine soap scum and grime!
What do you love about DIY cleaners? I think they are fantastic! Enjoy your Monday!
Marianne
Monday, August 5, 2013
DIY Monday: Fruit and Veggie Wash
Do you really want to eat food that has a bunch of pesticides and crap on it? I didn't think so! Why not get into the habit of ALWAYS washing your fruits and veggies as soon as the groceries are put away.
It takes 10 minutes, costs next to nothing, and is much safer than just using water!!!
I know I love having that extra peace of mind, knowing that I have pre-washed everything before it goes in the crisper drawers, so when Natalie and Eli ask for an apple...no big deal! It is clean and ready to eat!
All it takes is a sink full of water, a cup of white vinegar, and 10 minutes.


Do you have 10 minutes? I typically let Natalie put all the fruit in the water mixture so she feels as if she is a real part of the process. It is something we can all do. Let your fruits (or veggies) soak for 10 minutes, air dry and then put them in the fridge. That's it!
You will be amazed at how much longer your fruit will last!
So simple. So worth it. Have a great Monday!
Marianne

It takes 10 minutes, costs next to nothing, and is much safer than just using water!!!
I know I love having that extra peace of mind, knowing that I have pre-washed everything before it goes in the crisper drawers, so when Natalie and Eli ask for an apple...no big deal! It is clean and ready to eat!
All it takes is a sink full of water, a cup of white vinegar, and 10 minutes.


Do you have 10 minutes? I typically let Natalie put all the fruit in the water mixture so she feels as if she is a real part of the process. It is something we can all do. Let your fruits (or veggies) soak for 10 minutes, air dry and then put them in the fridge. That's it!
You will be amazed at how much longer your fruit will last!
So simple. So worth it. Have a great Monday!
Marianne
Sunday, August 4, 2013
Pie Day 2013
I have lived in Braham (almost) my entire life. I have attended Pie Day in the past, but this was my first year as a vendor. Let me tell you, we had a blast. I say "we" because I had my trusty sidekick-husband Ross, along for the ride!
Not familiar with Pie Day? Pie Day is an annual event in Braham, MN. It lands on the first Friday of August. Estimated attendance is around 5,000 people and Braham is considered the homemade pie capitol of MN. Lots of crafters are in attendance and lots of pie is eaten!!!


I truly believe what made this sale so much more successful than the sale in Eden Prairie was the fact that it was local. We are local. We live blocks away from the sale. My mom and dad are local. That is what made it so much fun.
We were able to see old friends and classmates from high school, make some sales, and interact with people from the community. I LOVE that! We also had a steady flow of law enforcement and fire department members in and out of our booth which always adds to the good time.
So much was taken away from this sale. I feel as if nothing needs to be changed design wise for my booth, but some pricing needs to be tweaked for our next sale in September. We will keep you posted on the details for this!
Thank you to all who came out and showed love and support to CindyBlue Designs. It means so much to my mom and I, coming from this small town of loyal Braham-ites! I am so proud to call Braham home and I am even more excited of where CindyBlue Designs is headed!!!
Thank you!
Marianne
Not familiar with Pie Day? Pie Day is an annual event in Braham, MN. It lands on the first Friday of August. Estimated attendance is around 5,000 people and Braham is considered the homemade pie capitol of MN. Lots of crafters are in attendance and lots of pie is eaten!!!


I truly believe what made this sale so much more successful than the sale in Eden Prairie was the fact that it was local. We are local. We live blocks away from the sale. My mom and dad are local. That is what made it so much fun.
We were able to see old friends and classmates from high school, make some sales, and interact with people from the community. I LOVE that! We also had a steady flow of law enforcement and fire department members in and out of our booth which always adds to the good time.
So much was taken away from this sale. I feel as if nothing needs to be changed design wise for my booth, but some pricing needs to be tweaked for our next sale in September. We will keep you posted on the details for this!
Thank you to all who came out and showed love and support to CindyBlue Designs. It means so much to my mom and I, coming from this small town of loyal Braham-ites! I am so proud to call Braham home and I am even more excited of where CindyBlue Designs is headed!!!
Thank you!
Marianne
Monday, July 29, 2013
DIY Monday: Liquid Laundry Soap
The one thing I have learned about being a stay at home mom is living with a sense of frugality. That is why I enjoy DIY so much! Not to mention...it's fun!
Laundry soap is expensive! Can I get an AMEN!?! Plus, my kids have sensitive skin, so I started to make my own laundry soap two years ago, so I could control what was going to touch their bodies. The Frugal Girls website has a TON of great "how to" websites for DIY.
Liquid Laundry Soap
Trust me! This stuff is super easy to make, inexpensive, and you will LOVE it! Let me know what you think!
Get Cleaning Friends!
Marianne
Here is a link to the liquid laundry soap courtesy of The Frugal Girls!
Laundry soap is expensive! Can I get an AMEN!?! Plus, my kids have sensitive skin, so I started to make my own laundry soap two years ago, so I could control what was going to touch their bodies. The Frugal Girls website has a TON of great "how to" websites for DIY.
Liquid Laundry Soap
You Will Need:
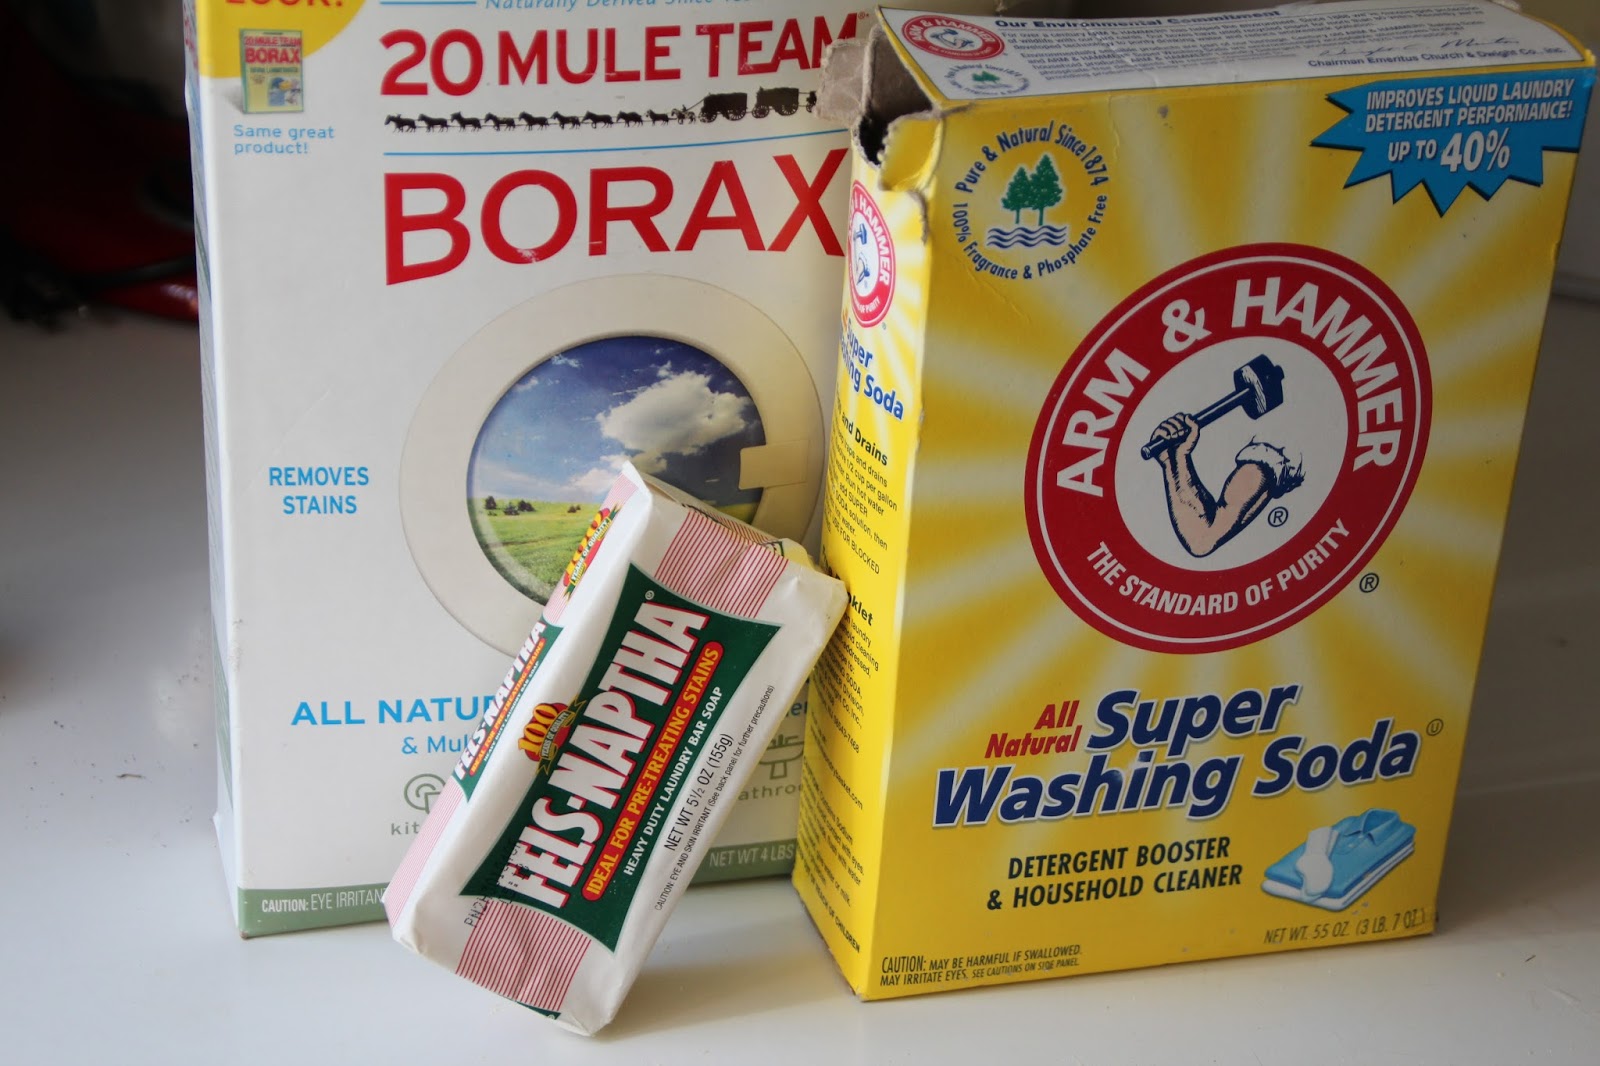
1/2 Cup Arm and Hammer Super Washing Soda...I have seen it at Wal-Mart, Fleet Farm, Cub Foods
1/2 Cup Borax
1/3 Bar of Fels-Naptha Soap...Also found at Wal-Mart in the laundry aisle, Fleet Farm
Empty plastic containers to store detergent (I use juice containers or laundry detergent containers)
The Nitty Gritty:
Grate the soap (I use the food processor...much easier :) pour into large saucepan
Add 6 cups of warm water
Add washing soda and Borax
Stir until completely dissolved
Remove from heat, set aside
Pour 4 cups HOT water into bucket and add soap mix
Stir and add 1 gallon PLUS 6 cups of water
Stir again
Transfer to lidded, plastic containers. Let set up to 24 hours. Shake well before each use. Detergent will be lumpy and thick!
Get Cleaning Friends!
Marianne
Here is a link to the liquid laundry soap courtesy of The Frugal Girls!
Labels:
diy,
diy cleaners,
diy recipes,
family,
homemade,
kids,
laundry soap
Subscribe to:
Posts (Atom)